This month, rice-planting season is in full swing across the United States.
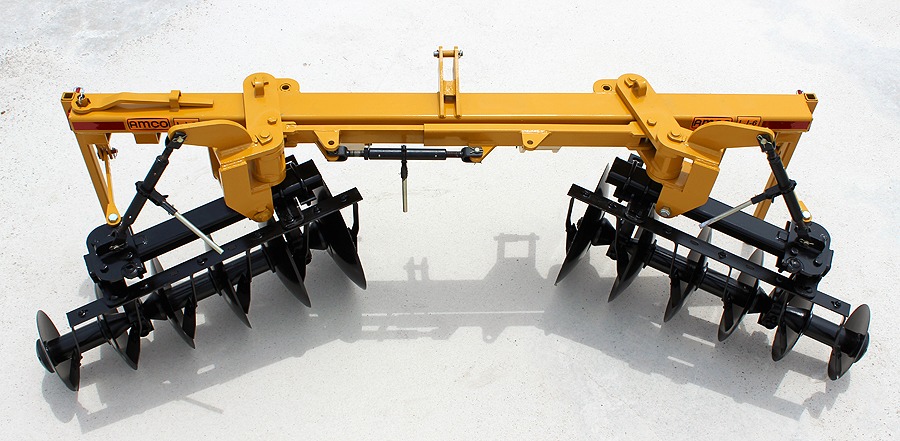
Rice is unique because of the irrigated conditions it’s grown in. For your rice to thrive, you need a well-built levee that produces just the right controlled flooding environment. To help you maximize the success of your rice crop, AMCO has created this guide to building quality levees with our revolutionary levee plow lineup, which includes the hydraulically controlled LF6 and LJ6 and manually controlled MLF6 and MLJ6.
STEP ONE: HITCH AND PREPARE FOR TRANSPORT
Before using your AMCO Levee Plow, double-check that all nuts and bolts are properly tightened and all cotter pins are spread. Make sure the plow has been lubricated.
AMCO Levee Plows are designed to fit category II and III three-point hitches and quick couplers. To hitch the plow to your tractor, simply pin it to the appropriate holes using the spacers provided.
The levee plow comes with standard adjustable parking stands. For transport or field work, the stands should be raised and pinned. For unhitching and storage, the stands should always be lowered to prevent tip-overs.
Caution – After parking the levee plow, always check to make sure it can’t be accidentally overturned.
STEP TWO: ADJUST GANG ANGLES
Move gangs forward or back to control the cutting angle.
The gangs may be set at any angle from 18-28 degrees. Under normal operating conditions, the gangs should be set somewhere between these two extremes for the best results. A greater cutting angle will move the soil further and improve penetration. A lesser angle will reduce the number of large clods and the amount of “balling up” the plow may experience in wet conditions. To decrease the gang angle, remove the angle-adjusting pins, located underneath the ends of the main frame. Then, shift the gangs forward and replace the pins at the desired setting. Before cutting, make sure both gangs are pinned off at the same location. To increase the gang angle, move the gangs toward the rear and re-pin.
STEP THREE: ADJUST CUTTING WIDTH
Use the ratchet jack on the side links to adjust the plow’s overall cutting width. For 8-blade plows, use the lower mounting lugs; for 10-blade plows, use the upper mounting lugs.
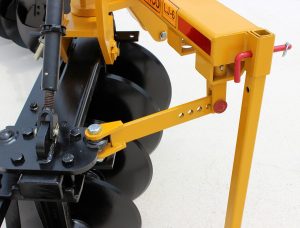
STEP FOUR: ADJUST GANG TILT
On the MLF6 and MLJ6, the gang tilt is adjusted manually. The LF6 and LJ6 are equipped with on-the-go tilt adjustment, so both hydraulic gangs can be simultaneously tilted from the tractor seat. This feature also allows the operator to reduce the overall number of passes, saving time and fuel. A tilt indicator that displays hydraulic cylinder stroke is located on the right-hand gang of the LF6 and LJ6, letting you know how much the gangs are tilted.

Different blade configurations are available to achieve desired levee type.
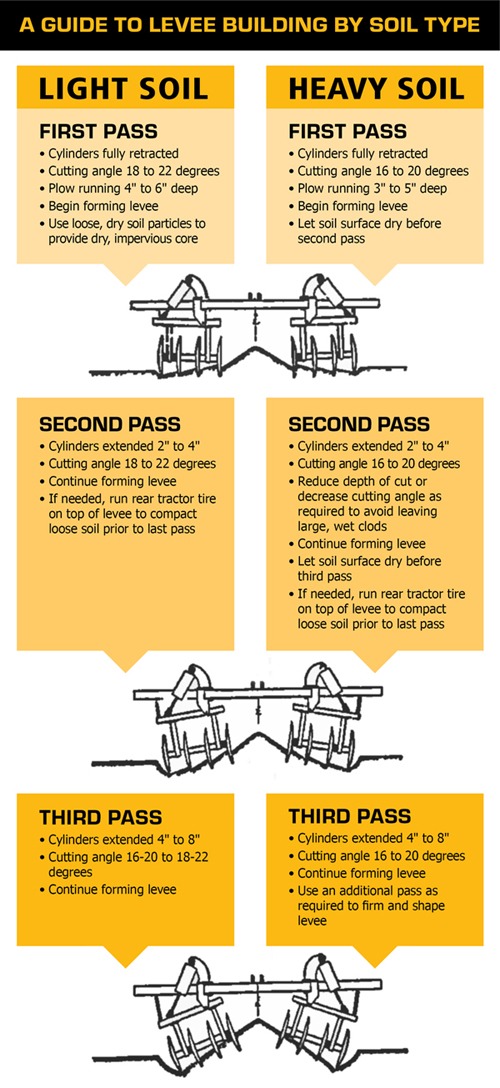
STEP FIVE: CONSTRUCT THE LEVEE
The number of passes required to build a levee depends on the soil condition and the desired depth. Under normal operating conditions, as a general rule, a levee can be constructed in three passes. While there are many methods of constructing a levee, below we have laid out the basic steps of the most common method.
When constructing your levee:
- Limit the depth of the cut on the first pass to avoid plowing up large clods. To prevent water seepage, the core of the levee should be made up of fine soil particles.
- If possible, allow time for the soil to dry between passes. Large clods are more readily pulverized in dry soil, which in turn makes the seedbed less porous and a better environment for growing rice.
- During the first pass, the two middle blades will do most of the work. Limiting gang tilt and primarily using the middle blades on subsequent passes will build a steep-sloped levee with a shallow borrow furrow on the sides.
Tip – A “borrow furrow” is formed when nearby soil is used, or “borrowed”, to build the levee. A borrow furrow can help with draining the rice field. If that is not desirable for your operation, use the optional feathering blade kit to reduce the effects of a steep borrow furrow.
- Pack the center of the levee with one or two passes of the tractor wheels to provide an impervious core before making the final pass.
- Firm and shape the levee during the final pass.
Building a high-quality levee helps ensure a successful rice crop. If you have any questions about levee building or about AMCO’s Levee Plow lineup, contact our tough tillage experts today.
Did you know? Both our Manual and Hydraulic Levee Plows are designed with reversible gangs, giving them the ability to both build up and tear down levees.