
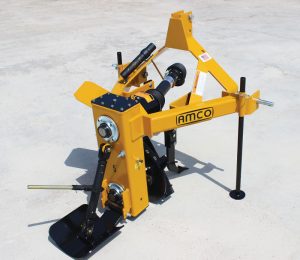
 Many growers think changing out the lower cutter head bearing on AMCO’s drainage Ditchers is a huge hassle. But if you have an hour of time and some basic tools, you can do it yourself—without removing the drive chain and sprocket.
Below is an overview of how to change the lower cutter head bearing on AMCO’s Vertical and Offset Rotary Ditchers (download printable instructions here).
Tools needed:
- Crescent wrench – 1 each
- 15/16″, 9/16″, ¾″, and 11/8″ sockets – 1 each
- Snap ring pliers – 1 each
- ¾″ and 15/16″ wrench – 1 each
- Hammer – 1 each
- Shop rags – 1 each
- Center punch – 1 each
- 7/32″, 5/16″, and ¼″ socket-style Allen wrench – 1 each
- Flat-head screwdriver– 1 each
Parts needed:
- Bearing (PT#11381) – 2
- Snap ring (PT#11988) – 1
- O-ring (PT#11979) – 2
- O-ring (PT#11329) – 2
- Gasket (PT#11359) – 1
Changing the bearing

Before each step, make sure your work area is safe and Ditcher is secure, to avoid injury. Always wear your personal protective equipment.
- Remove the driveline.
- Loosen the jam nut of the idler tension screw using a ¾″ box-end wrench. Remove the tension screw.
- Remove all cutter head bolts with a 11/8″ socket. Move the head out of the way.
- Remove the jam nuts on the front and rear collar with a 7/32″ socket-style Allen wrench.
- Remove the drain plug and drain all fluids with a 5/16″ socket-style Allen wrench. Once the oil is drained, remove all bolts, and the plate should fall off.
- Remove the bottom cover. Remove the front and rear flange bolts with a ¾″ socket. Also remove the o-rings and remove the back skid for easier access.
- Safely place the Ditcher on its back for easy access to the bottom sprocket. Remove the two set screws holding the bottom sprocket in place. This will allow the sprocket to slide freely on shaft. Stand the ditcher upright.
- Use a punch and hammer to hit the hole on the collar—this will free up the collar.
- Ensure the set screw is set flat to allow bearing to slide over. Take a file or sandpaper to that spot before you slide off the bearing. It should be smooth to the touch.
- Use the punch to hit directly on the shaft, until the shaft is driven through the rear bearing and collar, and the rear bearing falls off. Pull out the shaft from the front.
- Slide the front bearing off. Remove snap ring that holds the bearing in place. The collar and bearing interlock together, and there is a tool mark where the collar locked the bearing into place. Hit the punch in the opposite direction in of the tool mark.
- Once it is loose, secure the locking collar in a vise. Use hammer to tap collar down and off the shaft.
- On the shaft, there are two small o-rings that need to be replaced—remove o-rings. Make sure you are in a contaminant-free zone so no dirt/grit gets on shaft when you start replacing new parts.
- Place new flange on shaft. Place new o-ring on shaft.
- Slide the new bearing onto the shaft with the grooved side of the bearing face down. You may have to tap down with a small hammer until it is flush with the side of the collar. Be careful not to damage the bearing.
- Use the hammer to tap the punch in the tool mark and lock the bearing in place.
- Replace the set screw in collar with a 7/32″ Allen wrench.
- With the bearing, flange, and lock collar in place, slide the snap ring back down with the large snap ring pliers. Be careful not to scar the shaft. You might have to tap it with a small hammer to get it down into the groove above the bearing.
- Slide the o-ring over the shaft (PT#11329).
- Position the keyway on the sprocket (inside the Ditcher) to face straight up, so you don’t have to guess which direction the keyway on the shaft should face. Slide the shaft back into the ditcher.
- Now you’re ready to put the seal in place. Slide the o-ring over the bearing, then take the flange and make sure it is a good fit over the o-ring. Put the nuts back on—hand tighten, so there is still some play in the back while you are putting the new rear bearing on.
- Move to the back of the Ditcher. Scrape off raised surfaces left over from the old gasket, and wipe down to remove contaminants. This will create a good seal for the new gasket.
- Place the new o-ring over the shaft and slide it around in the screw. Slide the new gasket over the bolts in the direction the machine punched the bolt holes.
- Place the collar flange over the bolts. Slide the bearing and collar over the shaft with the cutout grooves towards the back. Use your other hand on the front to steady the shaft.
- 25. Take the other new large o-ring and place it all the way around the Ditcher bearing. Slide on the flange and hand-tighten the nuts.
- Tighten the front flange bolts, then tighten the back with a ¾″ socket.
- Place the locking collar on the shaft, twist to lock it in, then hit down on the keyhole with the punch to tighten the lock. Tighten the set screw with a 7/32″ Allen wrench.
- To set the sprocket, lay the ditcher on its back again. The sprocket should be completely to the back of the Ditcher. Rotate the shaft until you find your keyway, and make sure the keyway is pushed down not quite level to the sprocket.
- The keyway takes two set screws (to ensure main locking set screw does not back out), and one single set screw on the side of the shaft. Replace the set screws and tighten with a ¼″ Allen wrench.
- Wipe down the bottom of the Ditcher to remove contaminants. Bolt on the new gasket. Hand tighten first, then tighten completely.
- Before raising the Ditcher, reattach the cutter head. Hand tighten the bolts, stand the Ditcher upright, then tighten the bolts completely.
- Reattach the rear skid plate.
- Reinstall the idler screw. You’ll feel it starting to lift the idler sprocket back into place. Tighten with a crescent wrench until it is snug, but not too tight. Replace the jam nut.
- Replace the oil.
Your Ditcher is ready for use!